
Friday, January 22, 2016
Gnocchi soup in the Instant Pot
It snowed today (which is not all that common here) so it was time for some soup. Since the cupboards were a bit bare I mixed and matched and came up with this soup. I think it's a keeper!
1 chicken leg quarter
2 tbsp. olive oil
1/2 onion, chopped
1 large garlic clove, chopped
1 envelope chicken noodle soup
1 chicken bouillon cube
1 can cream of chicken
1 pack of gnocchi (1 lb)
1 small can of tomato sauce
Italian seasoning
Parmesan cheese
Sautee the chicken leg quarter with the onion and garlic in the Instant Pot for about 5 minutes. Add 6 cups of water and cook using the pressure cooker setting for 15 min. Let it cool.
Remove the chicken from the pot, take the meat off the bone, and cut it in little pieces.
Blend the broth, onion, and garlic and return to the Instant Pot. Set it to sautee. Add one envelope of chicken noodle soup, one chicken bouillon cube, one can of cream of chicken soup, the tomato sauce, and a pack of gnocchi. Season with Italian seasoning and let it cook until the gnocchi float to the top (5 min). Add 1/2 cup of parmesan cheese, stir, and serve.


Tuesday, November 3, 2015
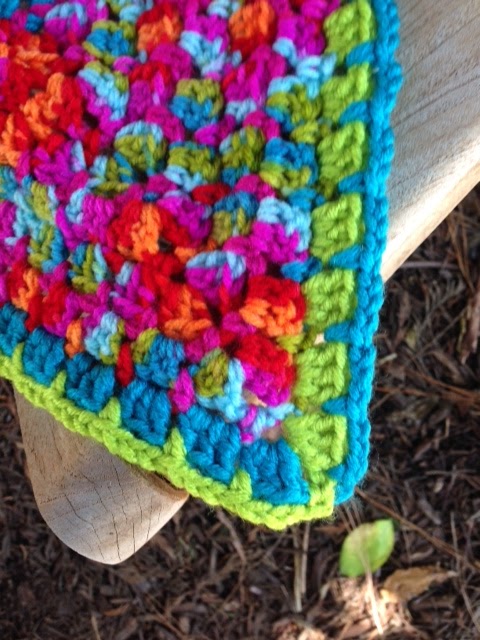
A colorful granny square blanket

The stitch is very dense and uses a ton of yarn. I ended up using some leftover orange yarn that I had at home and purchasing some extra green and multicolor yarns to finish the project. The multicolor yarn was the value brand from Michael's, and it was perfect because it had the exact colors I needed. I just love variegated yarns!
I finished the blanket with a border made of a contrasting color, since I didn't have enough of the blue or green yarn to do it all the same. I think it turned out good. Here is a detail of the border:
Wednesday, April 24, 2013
Apple fritter bread

If you decide to make this bread, be advised that the dough is very soft and not really good for kneading by hand. I just mix it in a bowl and pour it into the mold when I am ready.
Ingredients (makes one loaf):
Dough:
3/4 c milk
1/4 c butter
2 1/2 c all-purpose flour
1 tbsp yeast
1/4 tsp salt
1/2 c sugar
1/4 c water
1 egg
Filling:
2 apples, peeled and cut into small pieces
1 tbsp lemon juice
1/2 c sugar
1 tbsp vanilla
1 tbsp butter
1 tsp cinnamon
Make the dough first. In a large plastic container, heat the milk in the microwave for one minute, add the butter and heat another 30 seconds. The butter should melt into the milk, but the milk should not boil. After the butter is melted, add the rest of the dough ingredients and mix with a wooden spoon until all the ingredients are well mixed together. Let it rise in a warm place for one hour.
Make the filling: mix all the ingredients in a frying pan and cook until the apples begin to soften (3-4 min). Let it cool.
After the dough rises, it is ready to assemble. Grease a loaf pan and alternate layers of dough and layers of filling. The dough will be soft enough to be poured from the container into the loaf pan, and the layers will mix together a bit.

Let it rise in a warm place for one hour.
Bake at 350 for 50 minutes. Let it cool before taking it out of the pan.
Wednesday, January 23, 2013
A little table runner from scraps
I had a bit of time to myself on Friday and used it to finish this table runner. I had the blocks sitting around for more than a year, since I pieced the train quilt. These were my practice blocks when I first tried the pattern. All little scraps from the scrap pile in blues and yellows. It finally occured to me to put them together and make a table runner.
.jpg)
I added a simple blue backing fabric and did a binding from strips of denim that I had leftover. I quilted it myself and couldn't be happier with the result. I know that the seams are perfectly straight, and that it has many mistakes, but I love the way it turned out, and that makes it special to me.
.jpg)
I added a simple blue backing fabric and did a binding from strips of denim that I had leftover. I quilted it myself and couldn't be happier with the result. I know that the seams are perfectly straight, and that it has many mistakes, but I love the way it turned out, and that makes it special to me.
Monday, May 14, 2012
The bean cube
My dad brought us some beans from his little town in Spain, and I was so thrilled to plant them at home that I had them on the ground by March 15th. It helped that this was a very mild winter, that Daniel hand-watered them all by himself, and that it rained for a couple of days after planting them. Using a mixture of homemade compost and Miracle Grow soil on the top didn't hurt either. By the end of the week we had a bed full of beans!


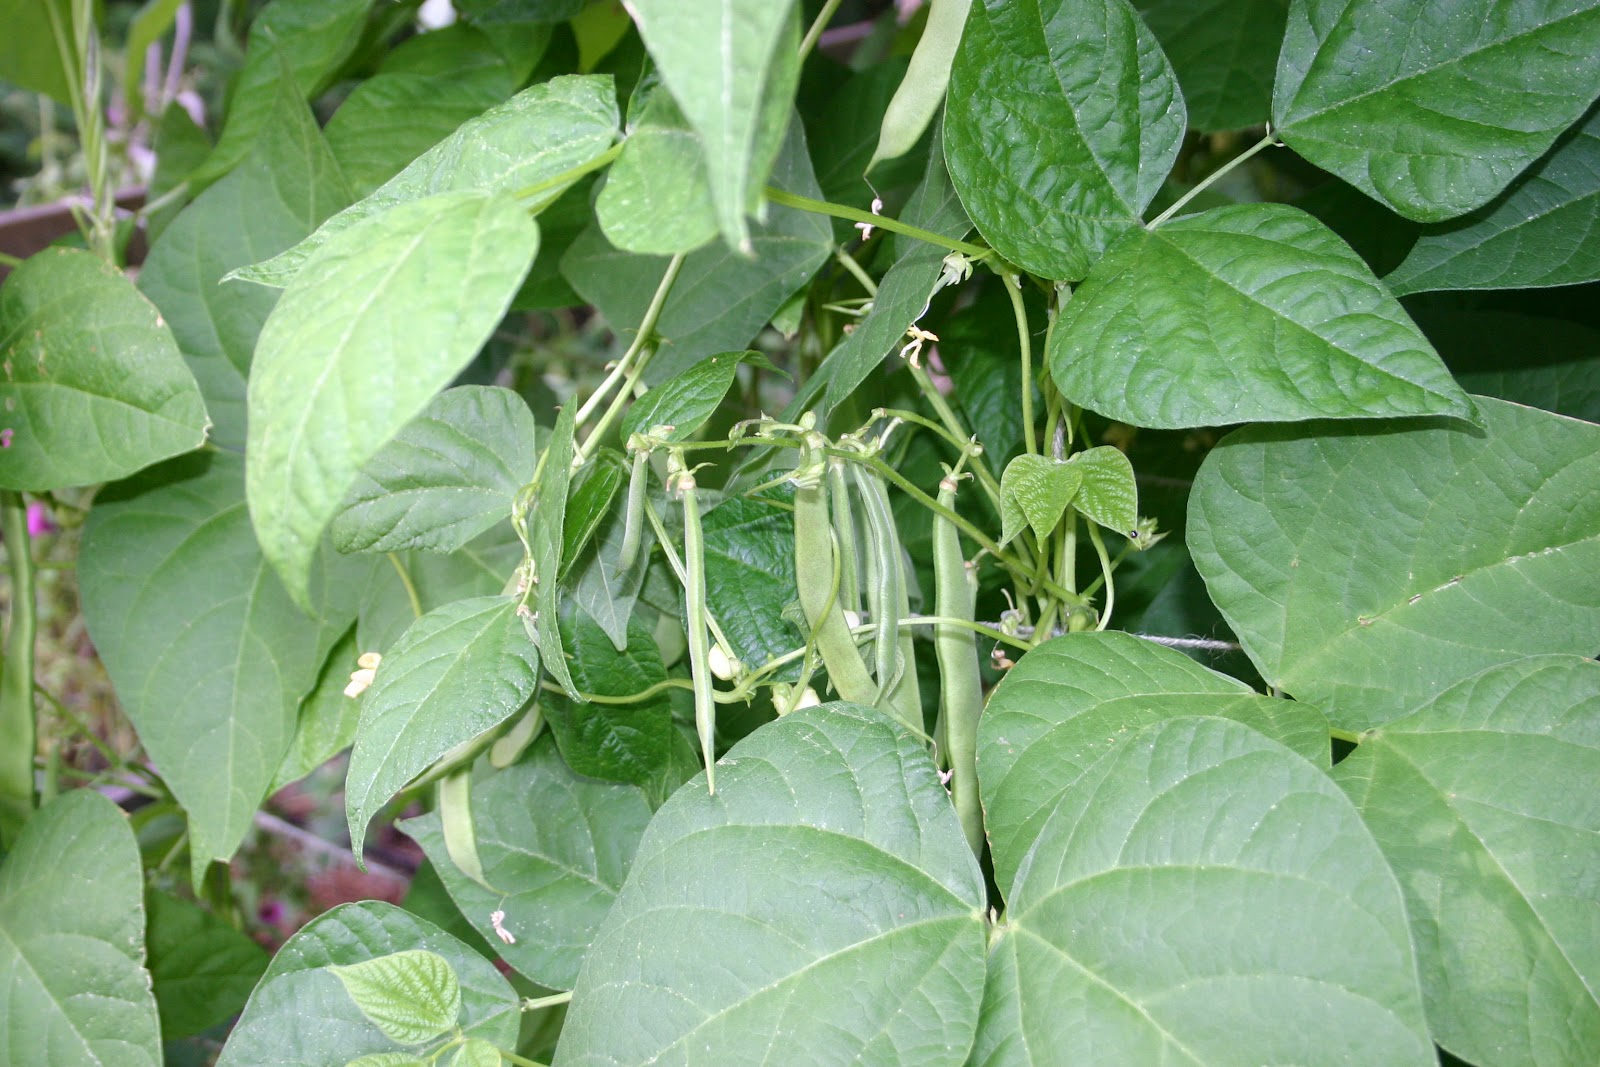
Since we knew that these were pole beans, I asked Craig to help me by building a support trellis for the beans. My dad thought that we were crazy, and that a few sticks on the ground would suffice, but it is clear that my dad has not been around our garden enough :) A few days later Craig had a three-dimensional trellis made of scrap wood and twine all in place. The beans loved it! The vertical spaces were taken over first, and then the horizontal ones. As of right now, just two months later, we have a solid cube of beans in our garden. It looks like this:
 The front of the bean cube has more leaves than the back, mostly due to sun issues, but all the vines are now covered with bean pods.
 I can't wait for all the pods to get fat and filled with beans. There is nothing quite like fresh beans, and these historied beans should taste all that much better!


Wednesday, April 11, 2012
A picture of all the small (and not so small) farmers

We haven't had a family picture taken in a long time. Three kids with widely conflicting schedules might be to blame, or maybe it has been lack of planning on my part. Wait, no, it couldn't possibly be that! :)
This Easter Sunday I figured that all kids were still reasonably clean (some were barefoot, but not dirty) and my dad had his camera handy, so we got a picture of all five of us. It is not perfect by any means, but we're all in it.
I can't help but wonder when did Victoria get so grown up. When did Nicholas get so tall? Why does it look like Daniel is almost bigger than me? And why on earth do I have to carry such a big boy?
I love to have all of them in one single picture. I think I will put it in my office and share it with all my friends. It's amazing what one single little picture can do to cheer you up when you're at work. It makes me think of all the great times we've had together in our little farm. And it makes me dream of all the great times to come.
Monday, March 26, 2012
The cutest horse ever
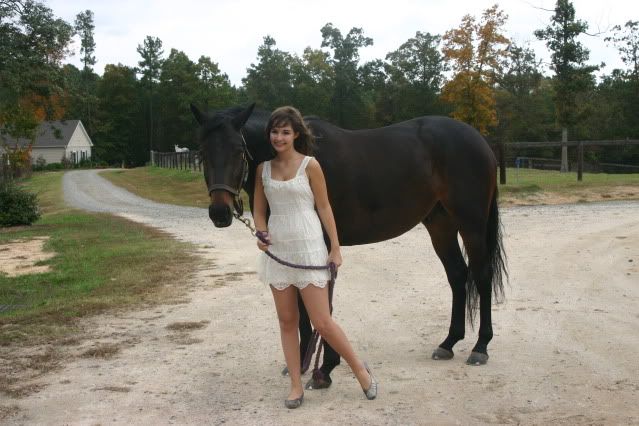
Although I have made my peace with the fact that we will not be moving out to the country to live in a real farm, there is a tiny hurt in my heart because that means that we will never be able to bring our horse, Padji, to come and live with us. I have never mentioned Padji here on the blog, but he is the one and only horse in my heart and, without a doubt, the cutest horse ever!

We got Padji for Victoria, and she rode him for several years in pre-childrens and childrens classes. He is a Selle Francais, and a ham (in case you can't tell by looking at the pictures) :) They are beautiful together, and I am very proud of all their accomplishments as a team. With Victoria preparing to go to college in the Fall, Padji will be leased out, which means that I won't get to see him much. I am really sad about this, but I can't bring him home, and he will be happy to have a dedicated rider. Or so I hope.
In past years I spent a lot of time at horse shows and horse-related events. Thinking about a future that does not include horses feels a bit strange, and very bittersweet. On one hand, I will have time for reading, gardening, and cleaning my house. On the other hand, I will miss the love of the horses, which is like nothing else I've ever experienced. And I will miss my horsey friends. And I will miss the wonderful compost :)
Sunday, January 22, 2012
A Paris-themed quilt

Victoria's bedroom is decorated in pink and black and has a Parisian theme. I wanted to make her a soft, fluffy throw for Christmas so she could take it with her when she goes to college, something that would remind her of home.
I got the fabrics a bit at a time, just cottons that made me think of the theme, and finally found a Michael Miller pink fabric with Eiffel towers that was what tied it all together. I pieced the top in a fairly simple way. All rectangles are 6x12", and I staggered them while keeping the order constant (I am going to have to branch out and do a random pattern one day, but I am just scared of randomness!).
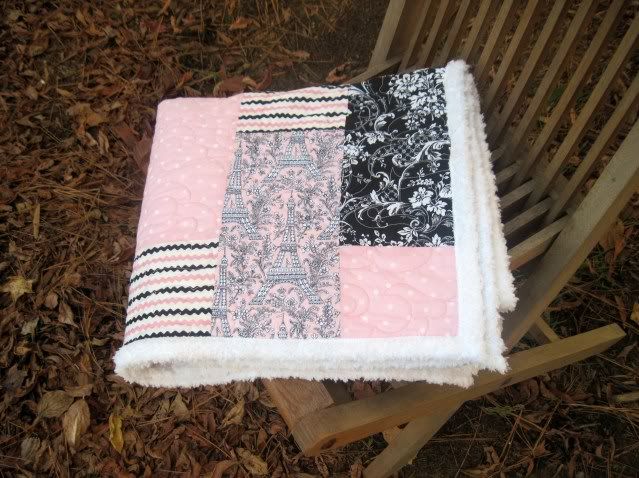
Once I had the top put togheter, and I found the fluffy fabric that I wanted to use for the backing, I sent it all to Linda at Long Arm Quilting and she did the rest. She searched for an Eiffel Tower quilting pattern and made the whole thing look just perfect. The throw was quilted with no batting, to keep it from getting stiff. It is beautiful, and it drapes so well.
Victoria has mentioned that the throw is a bit on the small side. I think when she goes to live in the dorms she will appreciate its compact size. I know its nice and warm just the way I wanted it. I hope she will grow to love it too.
Thursday, January 19, 2012
The littlest farmer is two!

Our newest addition to the smallest farm may have been a surprise, but we can't imagine life without him now! I can't believe he is already two years old! We celebrated with friends and neighbors, and then we celebrated some more at day care with all his peers. As you can tell by the picture, the boy loves cake, and the more colorful the frosting, the better!

We got him a Thomas the train cake from Harris Teeter, the obvious choice, which made him very happy. Not only did he get to admire the cake and eat it, he got a train and a caboose to play for. Can't argue with that deal.
It didn't take him long at all to understand that all the fuss was about his birthday, and he was a most gracious host for the most part. He even shared his new toys with all of his friends. Of the toys he got he really didn't seem able to pick a favorite. The Thomas tent was a big hit (and it's thankfully not hard to fold at all, because it sure is big and bulky!). Rocking Elmo was, well, rocking! It is really amazing that Elmo can recognize his instruments and pretty much carry a conversation. And the doctor's kit that he received means that now instead of calling him Mr. Daniel we will have to call him Dr. Daniel. Not bad for a guy who is just two years old!

Thursday, December 22, 2011
Collards for Christmas (well, for New Year's Day!)

I have wanted to have homegrown collard greens for New Year's Day ever since we planted our home garden. Collard greens are supposed to be a lucky way to start the year, and it just sounds good. However, every single year I've managed to mess it up by planting my collards too late. Collards don't grow fast in cold weather, and there is no way to cook a big pot of collards if all you have are seedlings.
This year I planted collards in the Spring, and nursed them all the way through the summer. Well, if you consider nursing the same as blasting them with water on a regular basis and picking up nasty cabbage moth larvae from them every week. I had collards full of holes marring my perfect little square foot garden landscape this whole gardening season. I did a lot of looking the other way. But look who's looking now!
I have three huge, happy, healthy big collard plants. I will have enough to cook a whole mess of collards for New Year's Day, and then some. It's like my very own Christmas present from my garden. And since it's the only thing in the garden right now (save for my loyal garlic seedlings), I'll take it!
New Year's Day Collards:
A big bunch of collards (8 cups cleaned and torn in little pieces)
A smoked ham hock
4 cups chicken stock
Cook on low in a crockpot for 8 hours. You can start it the night before and have them for lunch on New Year's day, with black-eyed peas.
Wednesday, November 30, 2011
The big pepper year

2011 wasn't a very good year for tomatoes or squash, but it sure was a good year for peppers! While the tomatoes baked in the sun, the pepper plants got bigger and stronger. As soon as the weather cooled off just a little bit then all the pepper plants were covered with white blooms and then with peppers right away. It's funny how weather that makes one crop miserable will help another one grow.
We planted some green bell peppers, and some jalapenos, but the real star this year were the Pimientos de Padron that we grew from seeds that my dad brought us from Spain. These peppers are like nothing else I've ever seen! They look so innocent, but they do have a secret...some of them are the hottest peppers you will ever eat! It is really weird and random. You're supposed to pick them while they are green and small. Some will be mild, some will be a bit spicy, and some will be worse than a habanero. Not kidding you, there is no rhyme or reason.
If you let them grow and turn red, then they are just too hot for words. Even our friends Jo and Christine, who can tolerate any kind of crazy hot food you can dish out, were floored by the peppers. It was kind of fun to surprise them!
Friday, November 25, 2011
The train quilt on the train bed
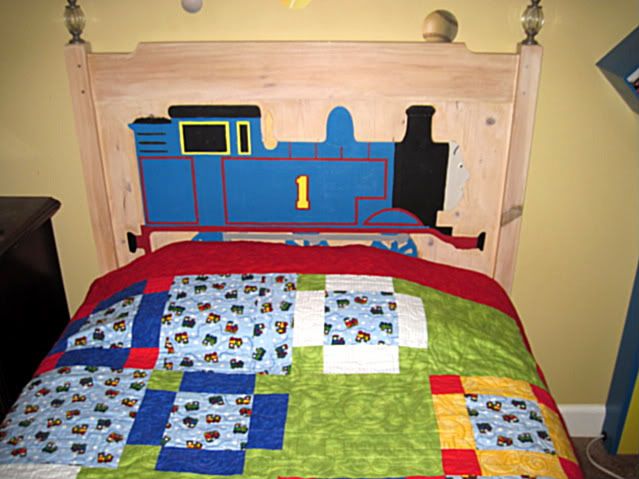
This project is a cooperation between mom and dad, and it came together just in time for Christmas! This will be Daniel's surprise as he will be getting his big boy bed on Christmas day :)
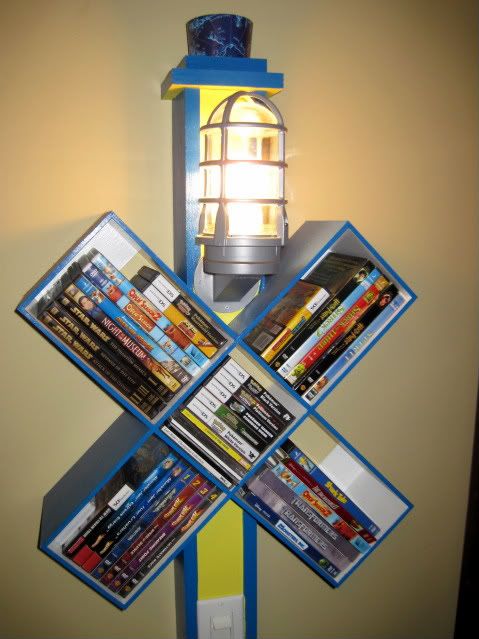
Craig made this bed for Nicholas almost 7 years ago. It took him a long time, because he was very careful with the woodworking, carving and painting. The bed is beautiful, but Nicholas is now getting to be too big for a train bed, so it's time to pass it on to Daniel, together with the train station lamp that doubles as a DVD shelf.
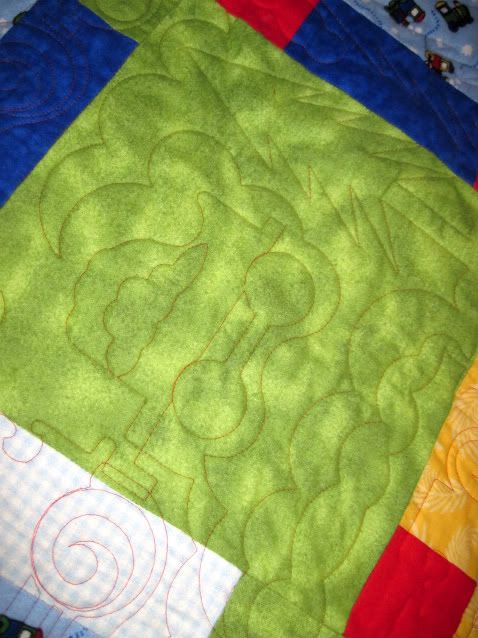
I wanted to make the train quilt to be his very own, and I really put my heart and soul into it. The train quilt really came alive with the wonderful quilting done by Linda Lovett (you can find her at www.longarming.com). She is an artist! Once I got the quilt in my hands, I couldn't wait to bind it, and take some pictures. Binding is not my favorite thing to do, but I was so fired up that I got it done in 3 nights.
I can't wait to see Daniel's face on Christmas day when he realizes that he now has a big boy bed!

Friday, November 18, 2011
A quilted receiving blanket
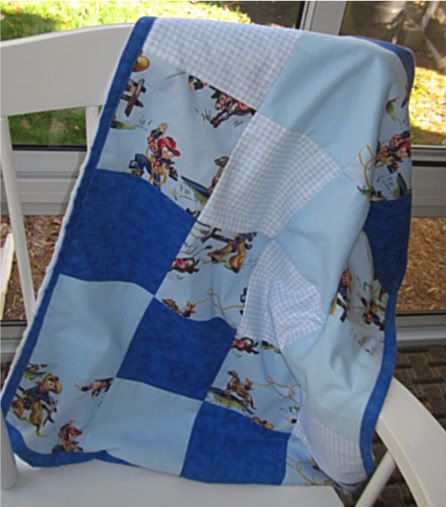
I made this receiving blanket for a friend who just had her first baby. The fabrics were all from my stash, all I had to buy was the chenille that I used for the reverse side. The squares are 6x6", and the whole thing took just two hours to make once I had the squares cut. There is no batting in the middle. The top is mostly flannels and quilting cotton (I think the little cowboy print is the cutest thing!), and the reverse is a light blue chenille. It is lightweight but very cuddly, and it was very well received.
I don't think you can every have too many baby blankets, and this one was handmade but easy to care for, so I hope that Karim and his mommy will enjoy using it! :)
Monday, November 14, 2011
A cake for Thanksgiving (early)
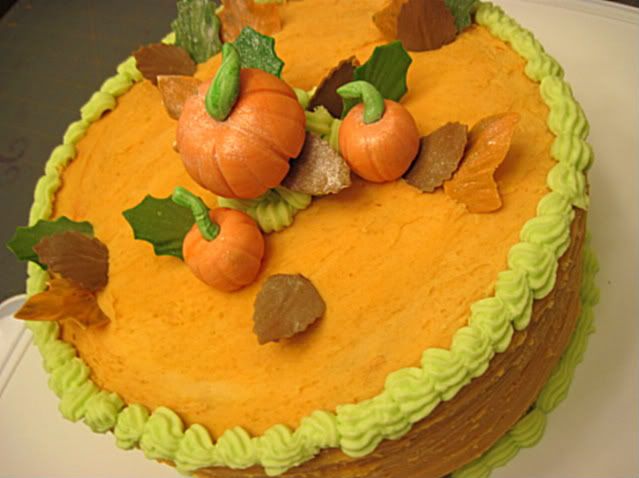
We had a little Thanksgving gathering at work and I volunteered to bring a dessert. Since the usual suspects were covered, I ended up signing up to bring a cake, which is not really something that screams Thanksgiving!
I gave the cake a lot of thought (OK, I procrastinated until the last possible minute) and finally went with a yellow cake with fruit filling and buttercream icing. I must say that the taste was pretty good.
I doctored up a plain yellow cake mix (from Aldi) with this recipe, which was given to me by Cake Diva, over at twopeasinabucket. You just add the stuff to the cake mix and bake as directed on the package. I used half a recipe and it made two good 8" round layers:
2 pkg boxes white cake mix
2 cup flour
2 cup sugar
1 1/2 tsp salt
2 2/3 cup water
4 Tbs vegetable oil
2 tsp real vanilla
2 tsp pure almond extract (I omitted this)
2 cup (16 oz carton) sour cream
8 large egg whites (or 4 whole eggs)
I made the buttercream icing with this recipe, which I don't know where it came from, but it is the best buttercream ever!
• 1 cup unsalted butter (2 sticks or 1/2 pound), softened (but not melted!)
• 3-4 cups confectioners (powdered) sugar
• 1/4 teaspoon table salt
• 1 tablespoon vanilla extract
• up to 4 tablespoons milk or heavy cream
I mix it all by hand. It takes about 5 minutes, and the consistency is very creamy and delicious.
Once the layers were cool and the frosting was made I put the first layer onto a plate and spread a thick layer of fig jam. On the other layer of the cake I spread a thick layer of buttercream frosting and I stacked them, with the frosting directly on top of the jam. I then frosted the cake and piped the little green border.
At that point the cake was looking cute yet very boring. I got out the Wilton gumpaste and my Wilton flower cutters and made some sad-looking autumm leaves. You have no idea how sad the leaves were! So sad that I ran to ACMoore and got some pearl dust to cheer them up. This did the trick. Once the leaves were dry, I put the leaves on the cake and things started to look better, but we were still missing a focal point. I then decided to go out on a limb and make some pumpkins out of gumpaste. To make the pumpkins, I colored a lump of gumpaste orange, divided it into a big ball and two smaller balls, and rolled the balls until they were smooth. I then pressed with my thumb on the top of each ball, which gave them a nice pumpkiny shape, and made the indentations along the sides with the side of a fork. Stems were made with just a little green gumpaste stuck to the top of each pumpkin. Pearl dust made them glistened and covered all the imperfections! (I love that stuff!).
Since all this running and feverish decorating took place at the last minute, the pumpkins were still wet when I placed them on the cake. It would have been much better to let them dry, but I simply had no time for it.
The cake was a big success, tasty and so pretty!
Saturday, November 12, 2011
Marvin, the socially awkward bird
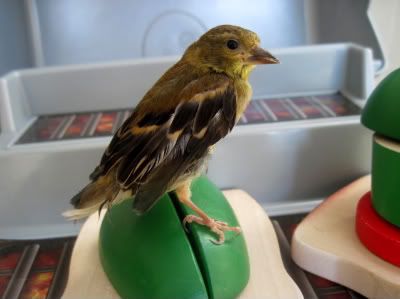
Hurricane Irene caused a lot of damage to the Carolina Coast. In our area we had a stormy day with high winds, but were very fortunate, considering that we're only two hours from the coast.
The high winds didn't bother us, but they must have displaced a little bird from his nest. Nicholas and his friends were playing in the front yard when they found him and brought him inside. The poor little bird was wet and terrified. His beak had a crack, his right wing bent down, no tail, and only one of his eyes was open. We put him in an empty fish tank, gave him water and a couple of worms (never leave good fishing bait go to waste!), and didn't really dare to hope for much. He looked like a goner at that point.
As it turns out, the little bird had a lot of fight in him! By the next day he had both eyes opened. He groomed himself and shed some broken feathers, and greeted us with tweets whenever we came around the tank. We did come around a lot, he was visited at least 10 times a day by the kids and their friends.
We looked around the Internet to find what kind of bird he is and we think that he is a warbler, but we may still have to revise that idea. He is small, the size of a skinny canary, or a finch, and has spindly legs with long nails. He is as sweet as can be. He sits on our shoulders and is very curious. He loves the computer!
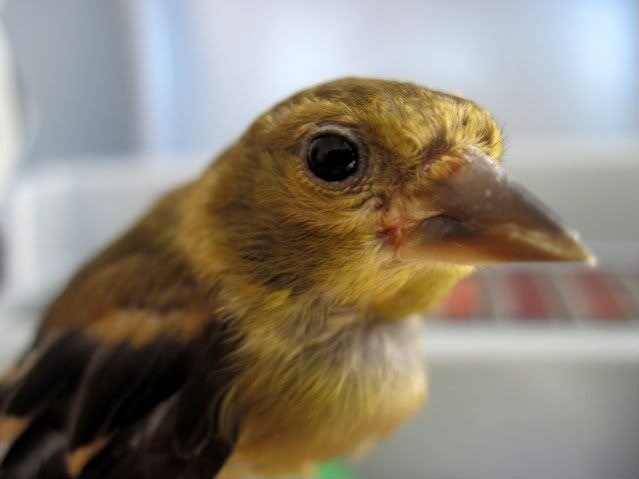
We got him a cage and some finch food and vitamins. He eats like a champ, and is looking great, but his tail feathers keep falling off. I am afraid that the base of his tail might have been damaged by the fall, because he has grown feathers on his tail twice, and twice the feathers have fallen off. He might have to live with us from now on, there is no way he could fend for himself if he can't fly.
If you know what kind of bird he is or how to help his tail grow, please do share :)
Marvin on the computer:

Close-up of Marvin's beak, which is fully functional:
Thursday, November 10, 2011
My first real quilt is getting quilted!
I am so happy it's not even funny! I've been making rag quilts for a while (and promise to post some very soon), but I have always wanted to piece a real quilt. I finally took the plunge, found a simple pattern, and made a quilt for Daniel's bed. Although it is only a twin bed, it is really really big to me (compared to the tiny rag throws that I had been making) and I think it is fair to say that it was a bit overwhelming. The piecing was fun, the sewing together of all the little blocks was kind of scary, and the idea of quilting this big old thing had me paralyzed!
One night two weeks ago I was tossing and turning in bed, trying to decide what to do, and I figured that I would google and come up with something. Well, it turns out that there are people that can quilt things for you. I knew that, but thought it was really expensive and that it took a long time. I inquired in a couple of different places, and finally called a lady in the NC mountains that sounded promising. Well, her name is Linda, and she is a doll, and she has a wonderful quilting machine that makes the whole process quite affordable. My quilt is at her house and may even be quilted this week! I could just squeal!
In case you want to see a picture of the quilt top, I stole one for you from Linda's blog (she has the most beautiful blog, and you can find it at: www.longarming.com/blog). Here it is for your viewing pleasure. Yes, I know some blocks are wonky :) I will keep you posted!

One night two weeks ago I was tossing and turning in bed, trying to decide what to do, and I figured that I would google and come up with something. Well, it turns out that there are people that can quilt things for you. I knew that, but thought it was really expensive and that it took a long time. I inquired in a couple of different places, and finally called a lady in the NC mountains that sounded promising. Well, her name is Linda, and she is a doll, and she has a wonderful quilting machine that makes the whole process quite affordable. My quilt is at her house and may even be quilted this week! I could just squeal!
In case you want to see a picture of the quilt top, I stole one for you from Linda's blog (she has the most beautiful blog, and you can find it at: www.longarming.com/blog). Here it is for your viewing pleasure. Yes, I know some blocks are wonky :) I will keep you posted!

Tuesday, November 8, 2011
Nothing like a pregnant woman learning how to knit!
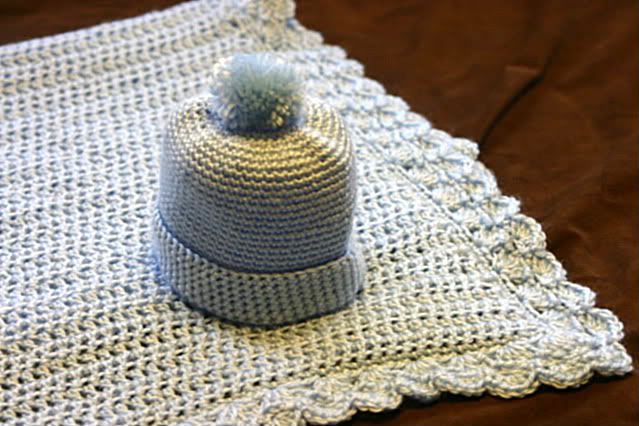
So...like any other pregnant woman worth her salt, I felt the deep and urgent need to made something by hand for my little blessing. With the first two I had felt the same urge, but my mom was around to take over and do all the knitting and crocheting required (my mom was fantastic!). With mom gone, I had no choice but to do it myself. By hand, all by myself, the hard way. Well, the youtube way. I started by making hats, and I probably picked the most difficult crochet baby hats out there. After weeks of practice, cussing like a sailor, and more frustration than I could possibly cram in this post, I made two hats for my little baby. Who turned out to be a big baby. With a big head. Yes, bigger than the hats. I still have them, untouched, unworn, so I can bestow them on a future daughter in law and fill her with awe :) Just as it should be.

On the practical front, I did complete a blanket. Blue yarn, a very simple design, and a forgiving border. I went as far as to taking pictures of it. For your viewing pleasure, and also because this is the only crochet blanket I will ever make. It lasted all of 8 weeks, and we managed to lose it after that. One less thing for the future daughters in law to worry about. Well, I'll think of something...

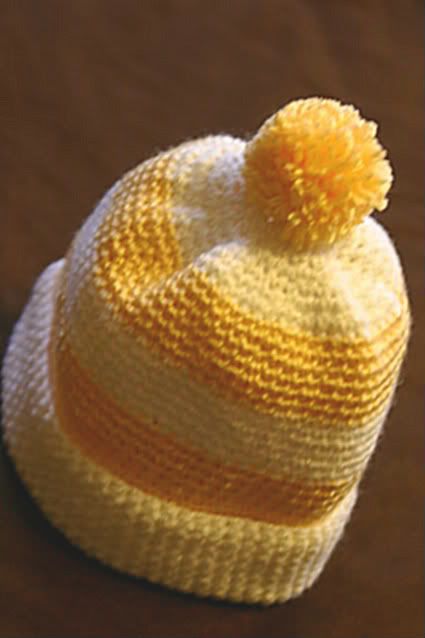
On the practical front, I did complete a blanket. Blue yarn, a very simple design, and a forgiving border. I went as far as to taking pictures of it. For your viewing pleasure, and also because this is the only crochet blanket I will ever make. It lasted all of 8 weeks, and we managed to lose it after that. One less thing for the future daughters in law to worry about. Well, I'll think of something...
MIA
I have been gone from this little blog for a very, very long time. So long that I had even forgotten my password! So long that I even had a baby in that time, and the baby is almost two now! (I know!). But I am back now, and got lots to share, so hopefully I can just pick it up and post the things we grow and the things we make.
Starting with the most important thing we've made lately, here is the baby in question! He was only three weeks in that picture, but time doesn't stand still, and he will be turning 2 in January. His name is Daniel, and he has turned our house upside down. He is bossy, demanding, and the cutest thing you ever did see. His big sister and big brother love him to pieces, and his parents...what can I say? We're just so lucky that we got to experience being parents one more time. Most people our age are thinking of retirement and grandchildren. We will probably have to work until we're 108, like our friend Bonnie likes to say, but we'll stay young chasing after this guy!

So, that's my story to explain why I've been missing in action for so long. Between a difficult pregnancy, work, and the demands of a baby in addition to our two older kids, I haven't really had the time to post about it. I barely found time to grow our garden or to do a few crafts. But I promise to share all about the time I've been away and then some in the days to come!
Starting with the most important thing we've made lately, here is the baby in question! He was only three weeks in that picture, but time doesn't stand still, and he will be turning 2 in January. His name is Daniel, and he has turned our house upside down. He is bossy, demanding, and the cutest thing you ever did see. His big sister and big brother love him to pieces, and his parents...what can I say? We're just so lucky that we got to experience being parents one more time. Most people our age are thinking of retirement and grandchildren. We will probably have to work until we're 108, like our friend Bonnie likes to say, but we'll stay young chasing after this guy!

So, that's my story to explain why I've been missing in action for so long. Between a difficult pregnancy, work, and the demands of a baby in addition to our two older kids, I haven't really had the time to post about it. I barely found time to grow our garden or to do a few crafts. But I promise to share all about the time I've been away and then some in the days to come!
Sunday, May 24, 2009
The year that peas grew (finally!)

Living in our tiny little farm, I think about gardening a great deal. During our (usually) short and mild winters I peruse seed catalogs and long for the day of tomatoes and peppers. Last year was the first time that we grew things all the way through the winter months, which made me consider planting things that would be edible in the Spring.
I started it with a pack of seeds last year. We read all about planting peas, soaked them and prepared 4 large containers, and planted them on a nice day in March. Soon after a plaque of squirrels descended over our garden and unearthed all our peas. It took longer to plant them than for the little beasts to dig them up.
The following weekend, undeterred, we did it all over again. After carefully planting the seeds we asked Craig for some help and managed to cover our containers with chicken wire. We squealed with delight when the little plants poked their tendrils out of the earth. We built a nice trellis for them. And, soon after, we watched them wilt in the sun of one of the warmest Aprils ever. So much for peas.
This year we decided to be more aggresive. We had the peas in the ground by February 2, 2009. Two nights after planting the peas we had a hard frost. Since we didn't see any peas come up from that first planting, we assumed that the seedlings were killed by the frost. We replanted our pea beds on February 14th. We seeded Alaska peas from Ferry Morse that had been soaked overnight with a tablet of Vitamin C. The peas took a whole week to germinate, but they ended up coming up nicely. Since this year we had more rain and cold weather than ever I covered the pea beds with plastic everytime that there was frost in the forecast. Soon after planting the beds were filling up with plants and we built them a trellis from twigs, fashioned after a trellis that we saw at Colonial Williamsburg.
By May 14th we harvested our first peas. Our first day we picked up 6 oz of peas, which we proudly shelled and prepared with wilted lettuce. We have picked about 2 pounds of peas and served them as a side dish 4 times. Our peas are very sweet and very tender, and taste as good raw as they do when cooked.
The hot weather is getting to our pea plants, and the harvest may be coming to an end by next weekend. We will replant those beds with beans to have them growing this summer. I think the long, rainy spring had a lot to do with our success with the peas. It really has been fun to have them growing in the garden!
Here is a couple of ways that we prepared our peas this year:
My Mom's Peas and Potatoes
6-8 oz of peas, shelled
4 potatoes
4 strips of bacon
1/2 of a small onion
2 large cloves of garlic
olive oil, salt, and pepper
Peel the potatoes, cut them in quarters, and boil them in salted water for 10 min. Add the shelled peas to the boiling water and cook until the potatoes are done. Drain the water and put the peas and potatoes back in the pan.
Cut the bacon in small pieces, and fry it in a little olive oil with the chopped onion. When the onion gets lightly browned and the bacon is almost done, add the chopped garlic. As soon as the garlic starts to brown, season the peas and potatoes with salt and pepper and pour the bacon/onion/garlic mixture with the oil over them. Serve right away.
Sherry Castle's Tiny Green Peas
(I got this recipe at a cooking class with Sherry and changed it a bit to our taste)
2 cups shelled peas
1/2 cup chicken stock
2 tbsp butter
1 cup finely chopped lettuce
Salt and pepper
Blanch the peas in boiling water for 5 min. Drain. Cook the chicken stock in a saucepan until reduced by half. Add the peas and the butter. When the butter is melted, add the lettuce and stir until it wilts. Season with salt and pepper.
Saturday, April 4, 2009
Victoria's Lemon Zest French toast
Ingredients:
2 eggs
1/2 cup milk
about 1 1/2 teaspoons of vanilla extract
1 1/2 tablespoons of butter
a lemon
either French bread or day old sandwich bread, either one works.
Instructions:
beat the eggs together in a large bowl
add the milk to the eggs and mix them together untill its blended evenly
add the sugar and the vanilla
heat up a nonstick pan or skillet on the stove and add the butter or a nonstick spray to keep the toast from sticking to the pan. when the butter has melted, lower the heat to medium.
once the pan is nice and hot, put a slice of the bread into the egg mixture. flip it over so that the bread soaks it up. place the bread on the skillet and cook for two minutes on both sides,or untill the toast is nicely browned, flipping with a large spatula. repeat this step with as many slices as you'd like.
once you have cooked a slice, place it on a large plate. sprinkle confectioners sugar over the top. take the zest from a lemon and zest it over the toast, this adds a really bright flavor to the toast so it doesnt taste so heavy.
enjoy! :)
2 eggs
1/2 cup milk
about 1 1/2 teaspoons of vanilla extract
1 1/2 tablespoons of butter
a lemon
either French bread or day old sandwich bread, either one works.
Instructions:
beat the eggs together in a large bowl
add the milk to the eggs and mix them together untill its blended evenly
add the sugar and the vanilla
heat up a nonstick pan or skillet on the stove and add the butter or a nonstick spray to keep the toast from sticking to the pan. when the butter has melted, lower the heat to medium.
once the pan is nice and hot, put a slice of the bread into the egg mixture. flip it over so that the bread soaks it up. place the bread on the skillet and cook for two minutes on both sides,or untill the toast is nicely browned, flipping with a large spatula. repeat this step with as many slices as you'd like.
once you have cooked a slice, place it on a large plate. sprinkle confectioners sugar over the top. take the zest from a lemon and zest it over the toast, this adds a really bright flavor to the toast so it doesnt taste so heavy.
enjoy! :)
Subscribe to:
Posts (Atom)